Fernilee Methodist Chapel. Paint and plaster analysis results and an assessment of the historic paint schemes used in the interior, together with a specification
Introduction
Fernilee Methodist Church instructed M. Womersleys to identify the paint types used on the interior church walls and the composition of the plain wall plaster. In addition, a general specification for replastering will also be provided, together with a suggested historic colour scheme that may have been used within the church. The later pages of this report detail the paint and plaster analysis results. These results are assessed below, within the context of the information available and known design trends from the mid-19th century onwards.
An assessment of the plaster and paint samples, the story they appear to tell, and the suggested repairs required.
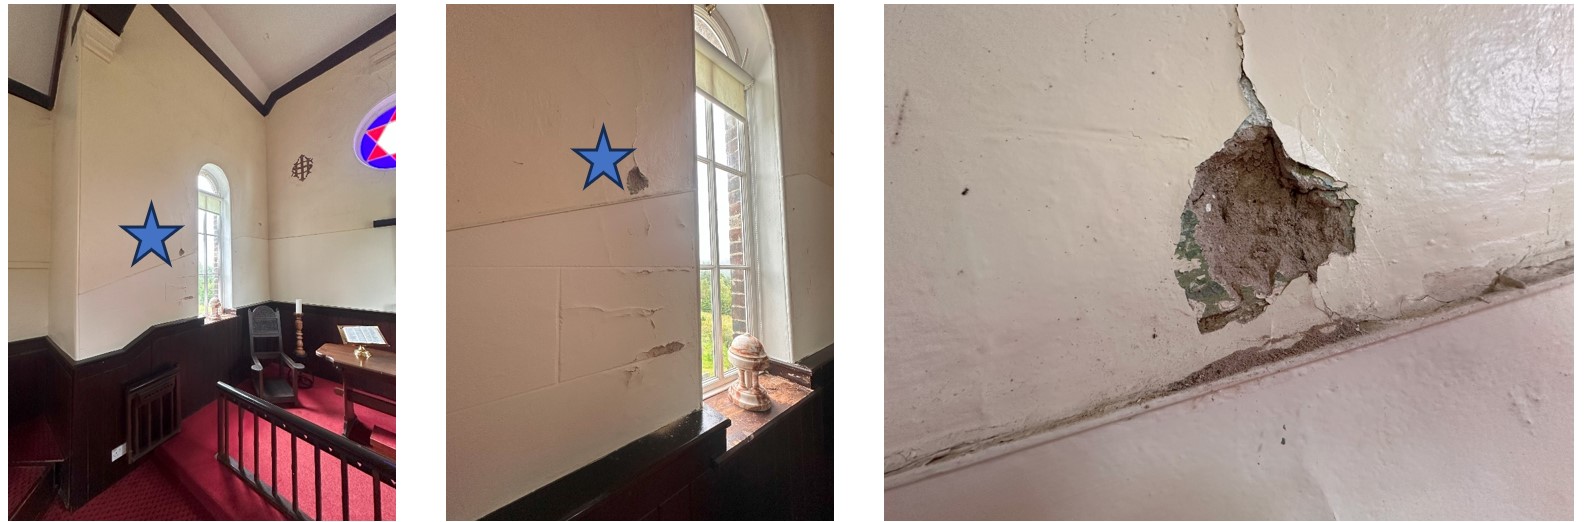
The church has been built from locally manufactured engineering bricks, that are excellent at resisting wind-driven rain and moisture. However, the plaster is now significantly de-bonded from the dense inner brickwork and the chapel requires complete re-plastering. As set out in the plaster analysis in Appendix 2, the mortar was probably made by volume from 3-parts slaked lime, including inert over and under burnt lime, to 4 parts fine quartz-based sand, and waste ash, originating from the lime production process. Before application, 10-15% of an early cement and fine animal hair were added to the mix.
The hard engineering brick background, part of a cavity wall construction, would suit the application of new plaster consisting of a moderately hydraulic lime-bound mortar, which will have enough adhesion to the dense bricks, after the application of a stipple coat, and give as good a vapour permeability as the original plaster. If the walls were re-plastered in a weaker pure lime putty-based plaster it would fail to bind to the dense brick substrate and a modern renovation plaster bound by cement and gypsum will suffer salt efflorescence, (as has occurred in the chancel plaster applied in the year 2000 which is analysed as sample 2 in Appendix 2). A suggested general specification for re-plastering is provided in Appendix 3.
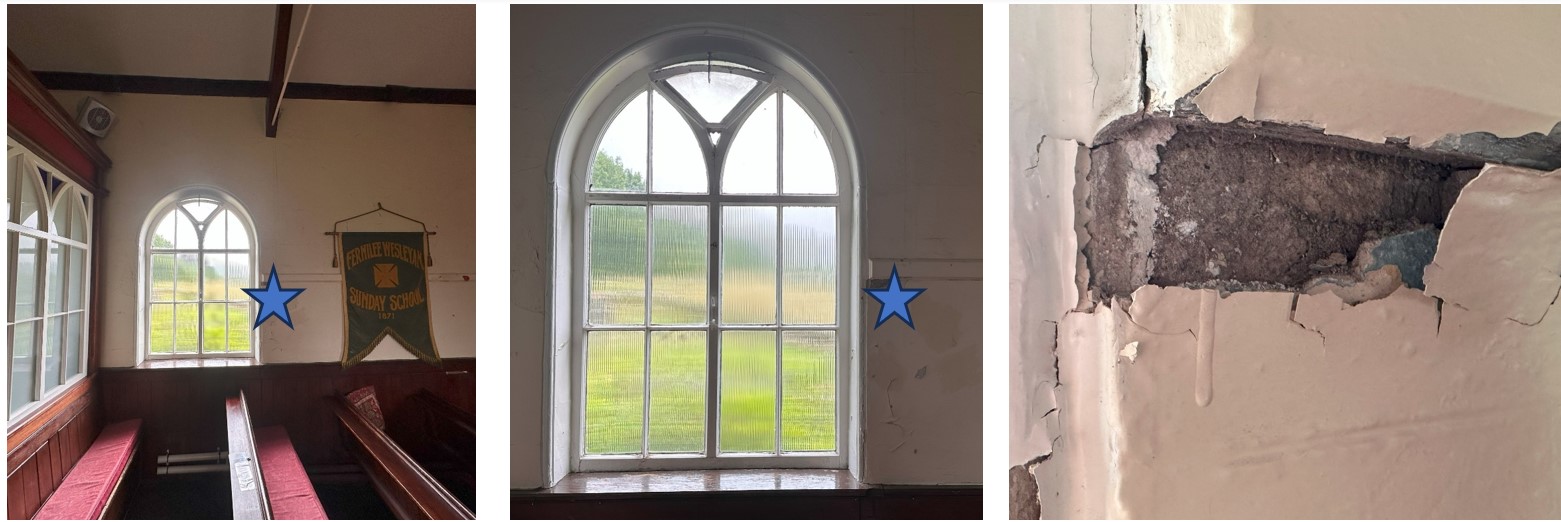
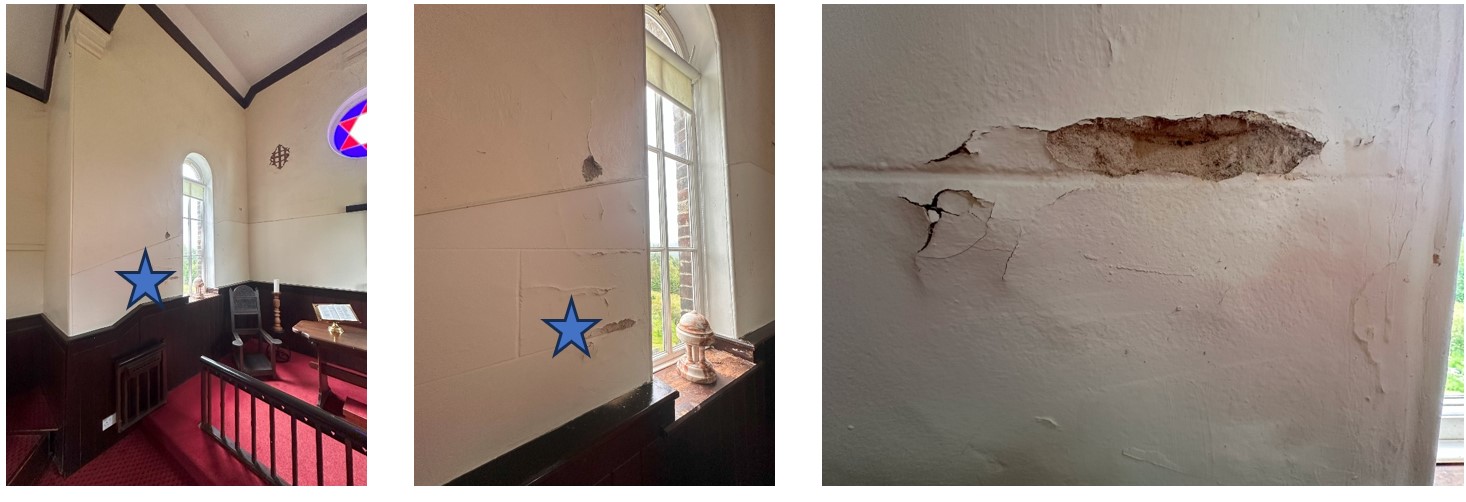
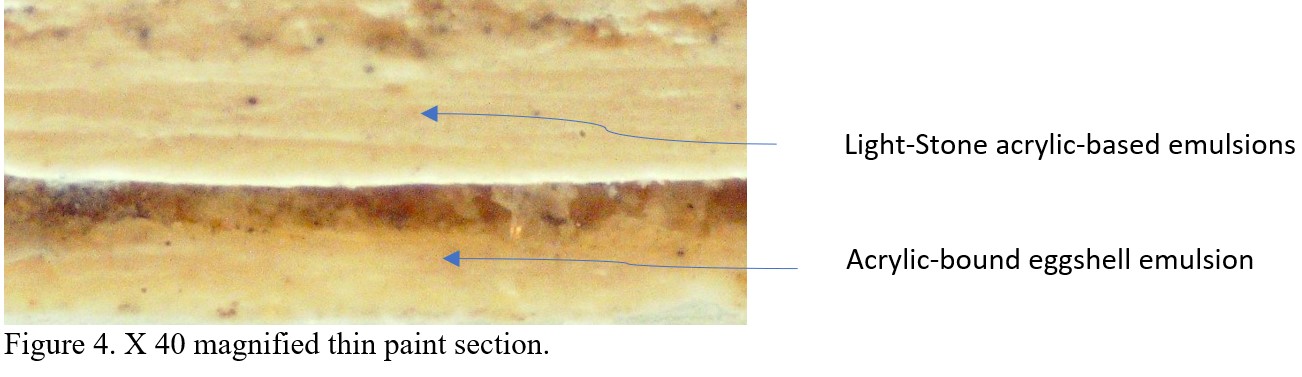
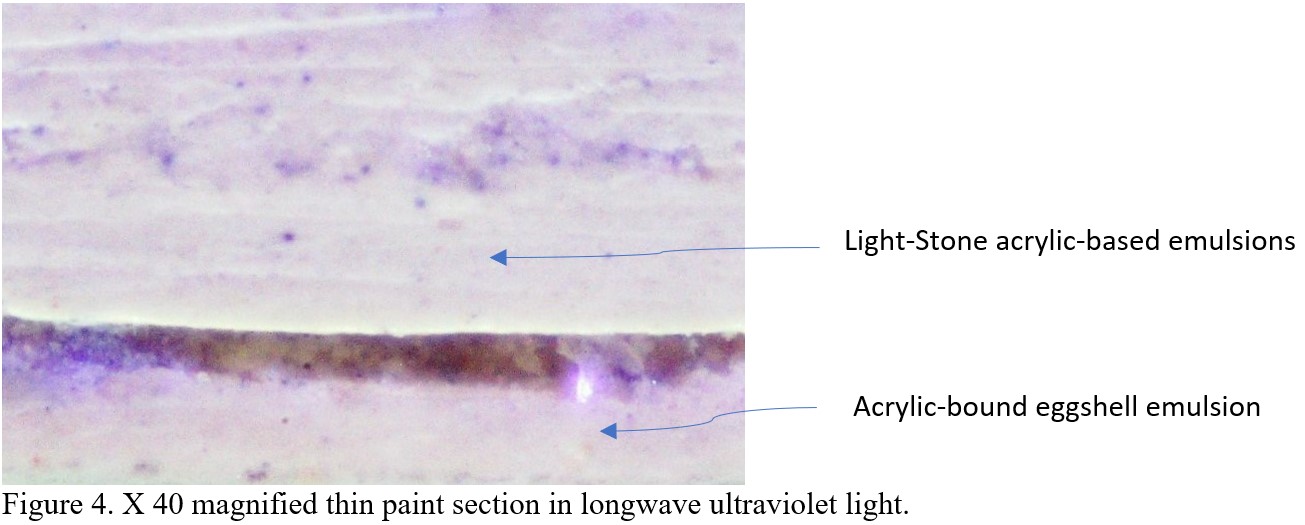
The current upper, acrylic plastic bound, paint layers found in all four paint samples set out below, have exaggerated the decay of the plaster beneath and allow condensation to sit on the surface of the walls, which encourages black organic growth and mould. There is no point removing the upper modern paint layers as the plaster below needs complete replacement.
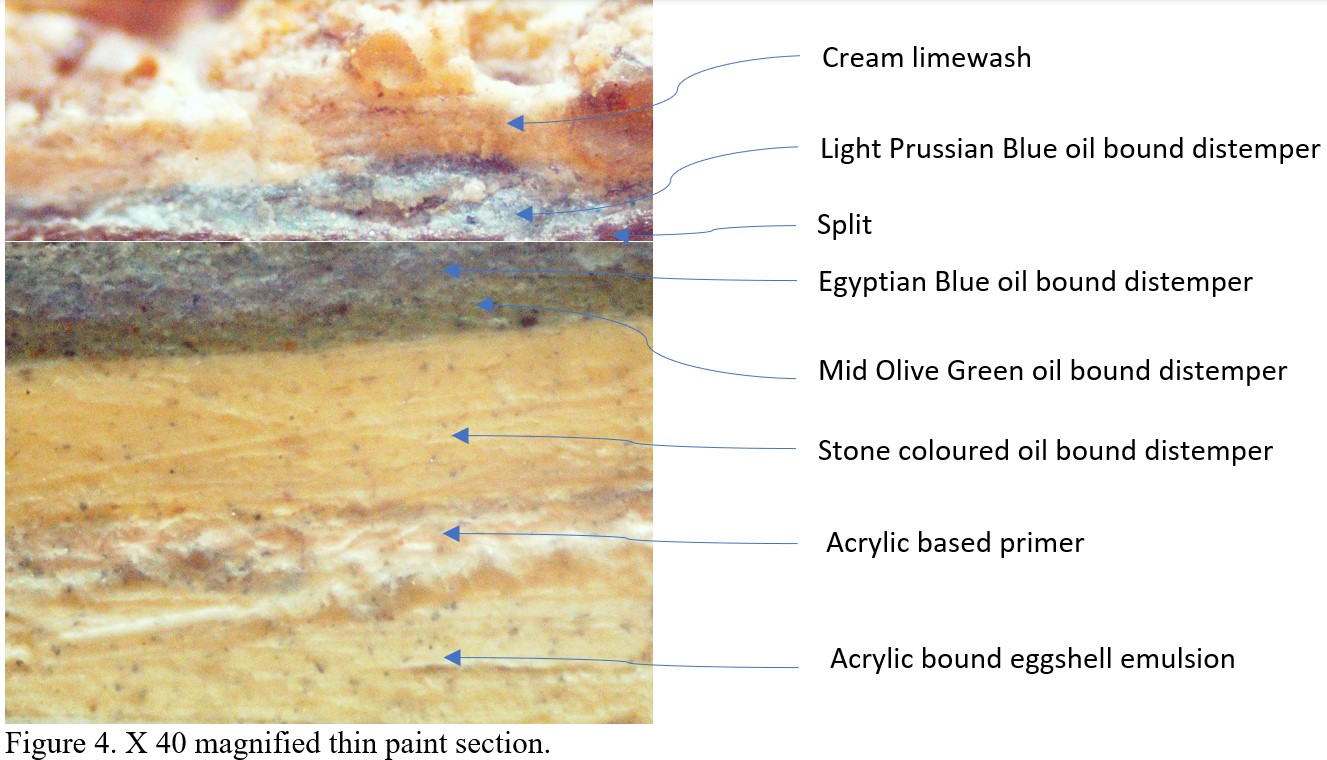
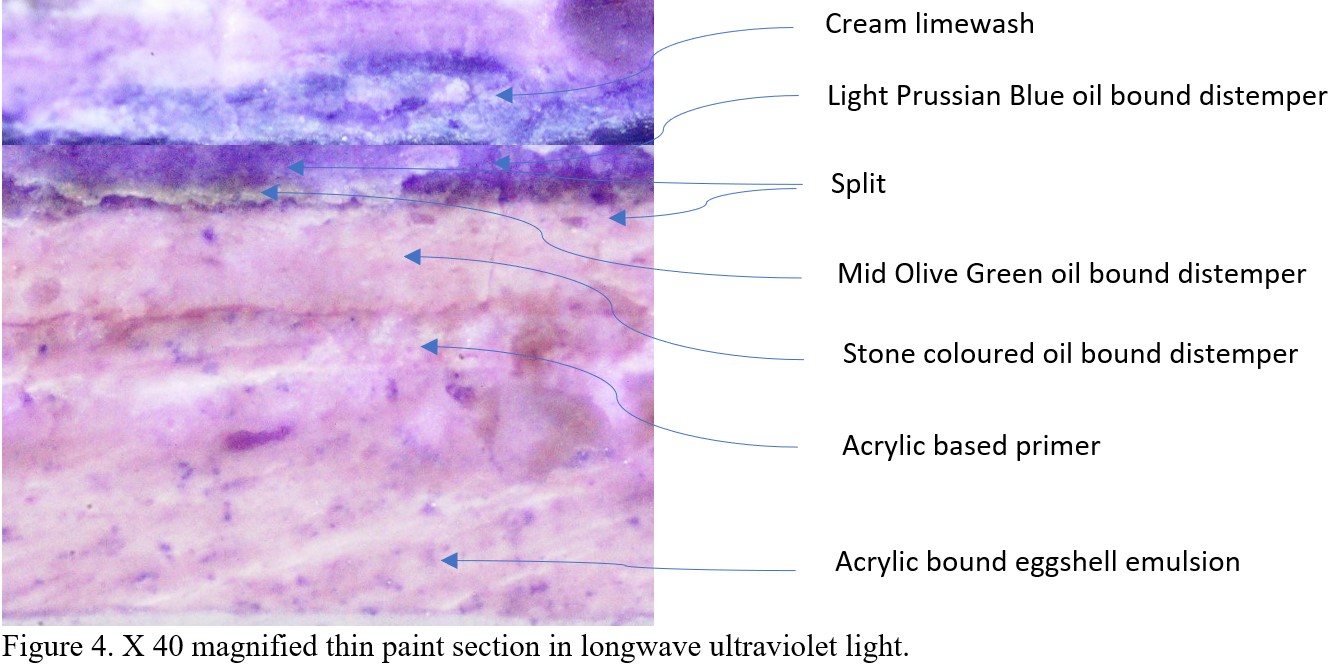
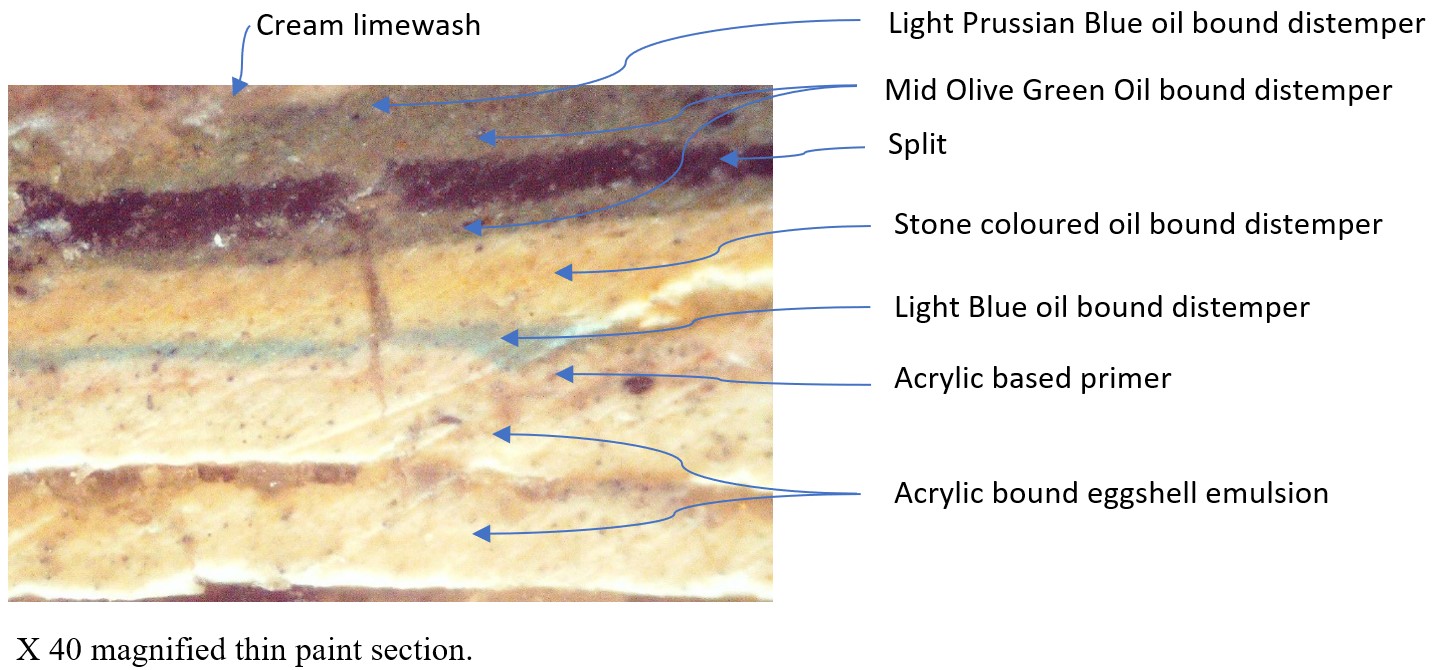
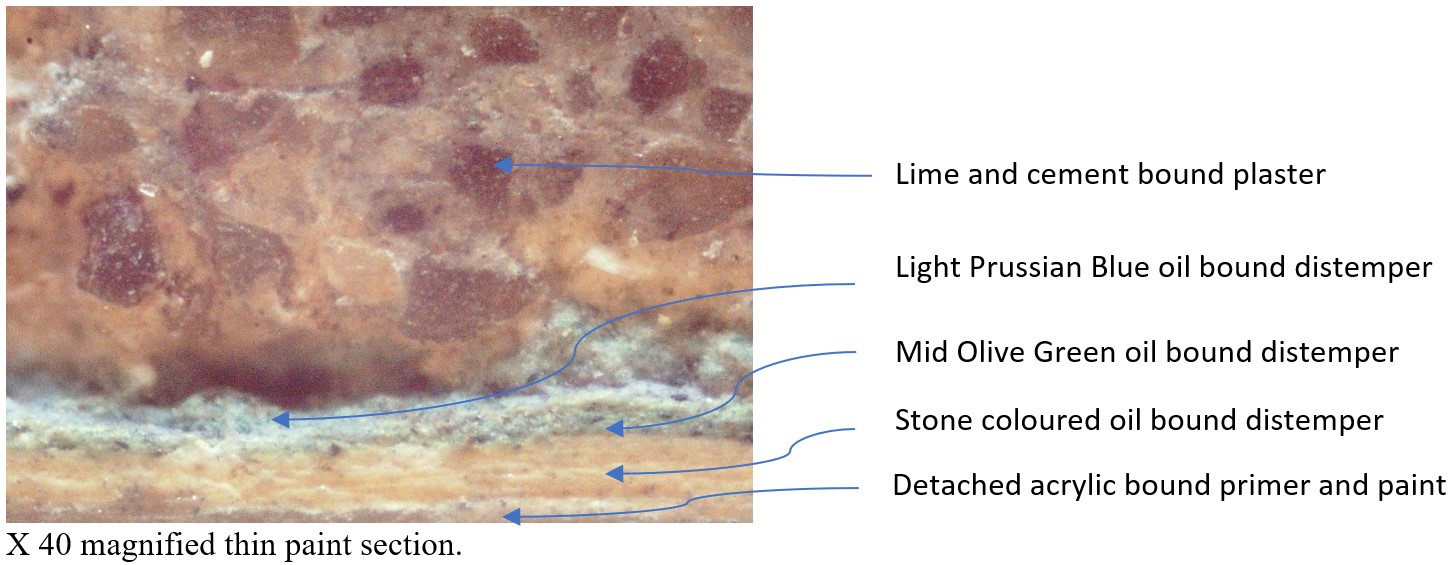
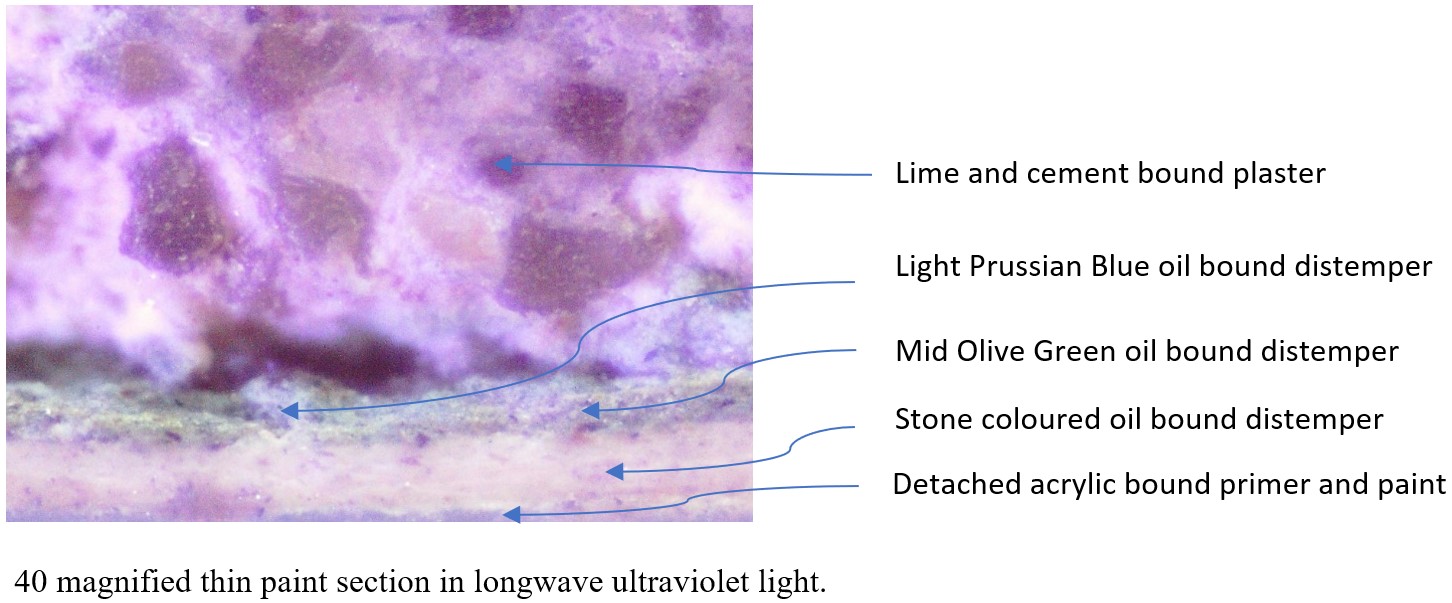
Once the walls have been re-plastered and allowed to dry out, they should be painted with a very vapour-permeable paint, a suggested paint specification is set out in Appendix 4. The colours that could be considered are set out in the paint analysis results below. They show that the earliest colour scheme within the nave and chancel consisted of a Light Prussian Blue oil-bound distemper before layers of Egyptian Blue were applied.
Blue wall paints and blue wallpaper became popular in England, as well as Europe,[1] in the 3rd quarter of the 18th century, seen in a ‘Section through a London Town House’, which was probably shown at the Royal Academy in 1774.[2] Early blue paint colours can be found at Edale in one of the oldest Methodist Chapels still in regular use. A blue colour decorated the walls of Holy Trinity, on Boar Lane at Leeds before 1880, as shown in Figure 4, at St Mary’s in Ealing, produced in a similar period,[3] and blue-grey wall paint can be seen in early images of Wesley’s chapel in London, see Figure 3. Later at the turn of the 20th century, the traditional use of light blues and green-blue colours continued in the Edgar Wood designed Long Street Methodist Sunday School, a Grade II* listed building in Middleton, Manchester.[4]
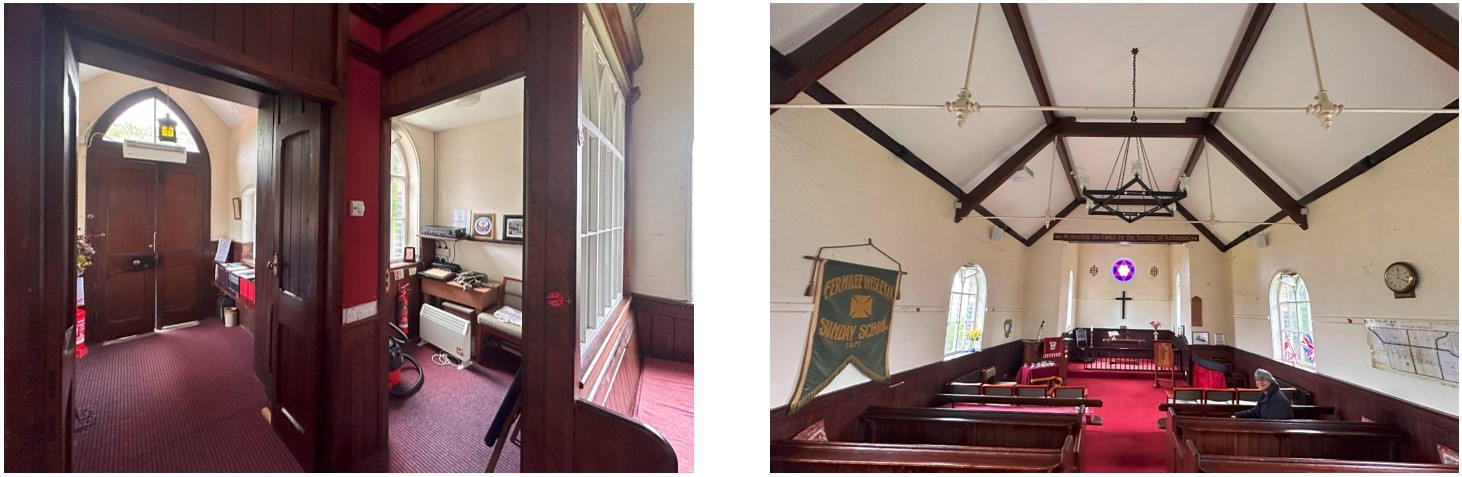
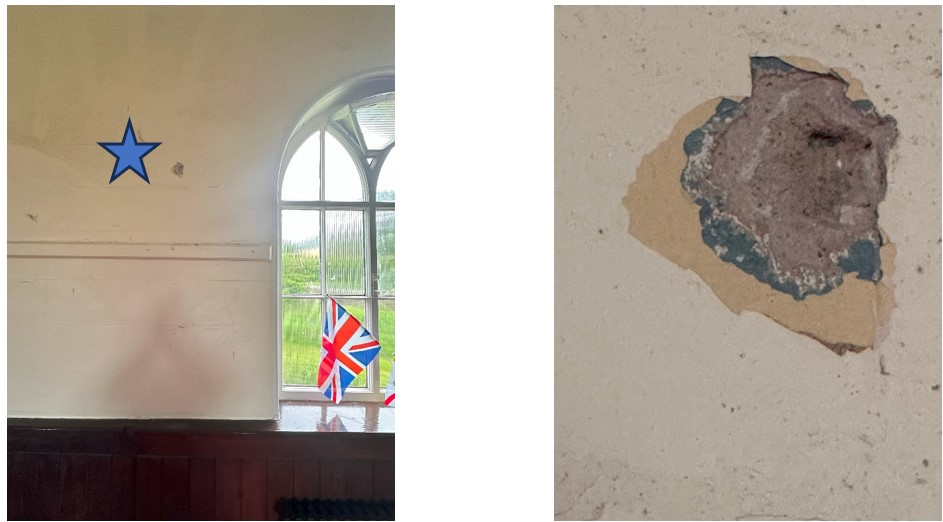
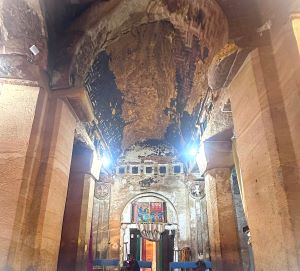
Figures 1 and 2: The interior of Fernilee Methodist Chapel today.
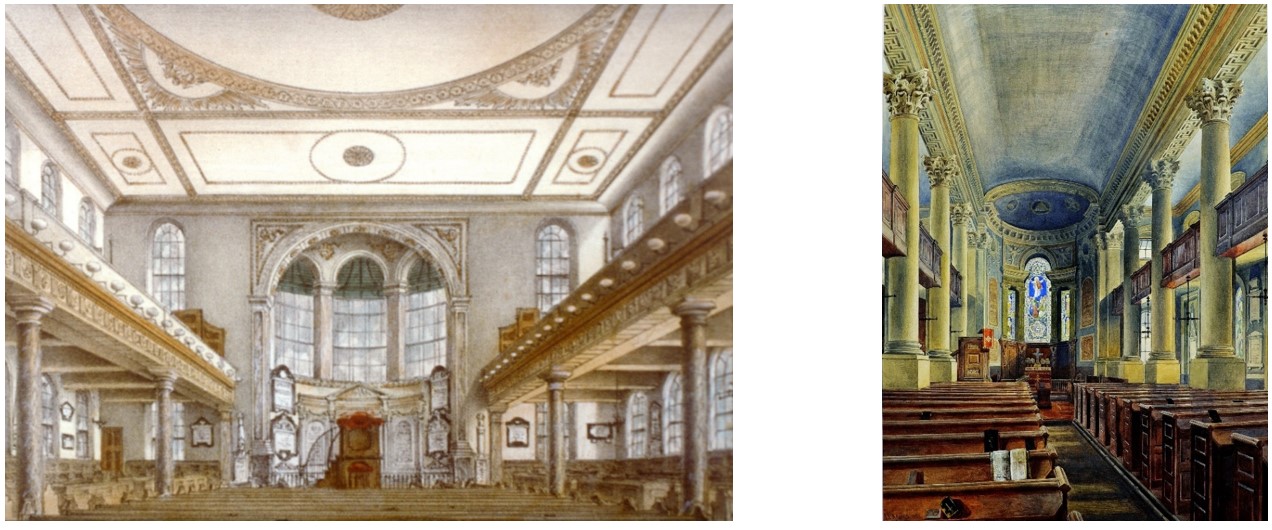
Figures 3 & 4. Engraving on paper c. 1870: A Victorian view of the interior of Wesley's Chapel, City Road, London. Holy Trinity (not Methodist) Boar Lane, Leeds, engraving from before 1880
APPENDIX 1: PAINT SAMPLE ANALYSIS
Sample 1: East end of the southern nave wall, above the pews but below the wooden rail
Sample 2: West end of the southern chancel wall, plaster and paint from 2000, after removal of choir
Sample 3: West end of the southern chancel wall, above former choir stalls

Sample 4: West end of the northern nave wall, above the wooden rail
APPENDIX 2
PLASTER ANALYSIS NO.1: FROM THE EAST END OF THE SOUTH WALL TO THE NAVE JUST ABOVE THE PEW HEIGHT AT FERNILEE METHODIST CHURCH
From the nature of the binding matrix of the mortar sample and information gained from the analysis, the mortar was probably made by volume from 3-parts slaked lime, including inert over and under burnt lime, to 4 parts fine quartz-based sand, and waste ash, originating from the lime production process. Before application, 10% of early 20th-century cement and fine animal hair were added to the mix.
SUGGESTED REPLACEMENT PLASTER
The hard engineering brick background, part of a cavity wall construction, would suit the application of a moderately hydraulic lime-based plaster, which will have enough adhesion to the dense bricks, after the application of a stipple coat, and give a similar vapour permeability to the current plaster.
PLASTER ANALYSIS NO.2: FROM THE SOUTH WALL TO THE CHANCEL PATCHING FROM 2000, AT FERNILEE METHODIST CHURCH
From the nature of the binding matrix of the mortar sample and information gained from the analysis, the mortar was probably made by volume from 1 part cement to 6 parts hydrated lime and limestone fillers, to 5 parts fine quartz-based sand, and waste ash, originating from the lime and cement production process. This may have been a modern premixed lime cement and gypsum blender plaster. This is breaking down with salt crystallisation encouraged by the gypsum and tricalcium silicates contained in this plaster.
SUGGESTED REPLACEMENT PLASTER
The hard engineering brick background, part of a cavity wall construction, would suit the application of a moderately hydraulic lime-based plaster, which will have enough adhesion to the dense bricks, after the application of a stipple coat, and give a similar vapour permeability to the current plaster.
PLASTER ANALYSIS NO.3: FROM THE SOUTH WALL TO THE CHANCEL JUST ABOVE FORMER CHOIR PEW HEIGHT, AT FERNILEE METHODIST CHURCH
From the nature of the binding matrix of the mortar sample and information gained from the analysis, the mortar was probably made by volume from 3-parts slaked lime, including inert over and under burnt lime, to 4 parts fine quartz-based sand, and waste ash, originating from the lime production process. Before application, 12% of early 20th-century cement and fine animal hair were added to the mix.
SUGGESTED REPLACEMENT PLASTER
The hard engineering brick background, part of a cavity wall construction, would suit the application of a moderately hydraulic lime-based plaster, which will have enough adhesion to the dense bricks, after the application of a stipple coat, and give a similar vapour permeability to the current plaster.
PLASTER ANALYSIS NO.4: FROM THE WEST END OF THE NORTH WALL TO THE NAVE ABOVE THE MODERN PATCHING, AT FERNILEE METHODIST CHURCH
From the nature of the binding matrix of the mortar sample and information gained from the analysis, the mortar was probably made by volume from 3-parts slaked lime, including inert over and under burnt lime, to 4 parts fine quartz-based sand, and waste ash, originating from the lime production process. Before application, 14% of early 20th-century cement and fine animal hair were added to the mix.
SUGGESTED REPLACEMENT PLASTER
The hard engineering brick background, part of a cavity wall construction, would suit the application of a moderately hydraulic lime-based plaster, which will have enough adhesion to the dense bricks, after the application of a stipple coat, and give a similar vapour permeability to the current plaster.
APPENDIX 3
GENERAL PLASTER SPECIFICATION:
Background preparation: Follow good working practices and thoroughly clean the background. If the background is saturated check for cracks or other causes of water penetration, (faulty gutters or drainpipes, cracks in the joints, etc.). Causes of dampness should be remedied and cracks should be cleaned out, sealed with an NHL pointing mortar, and allowed to cure for 1 or 2 days before plastering starts.
Suction Control: if necessary, apply sufficient water to reduce excessive suction. On many occasions, this is done the day before, several times with the last damping just before application starts. Apply water from the top of the structure. The top of the structure will dry out before the bottom. In base coats, this means scouring back the lower section might have to be done later than the upper section. Always dampen down before applying subsequent coats
Keying: Rake back joints (normally 10mm) or apply a 1-3 mm Stipple or Spatterdash coat to provide adequate keying to the background. This should consist of 1 part Ionic Old White NHL3.5 mixed with 1 ½ parts well-graded washed river sand 3 mm down.
Apply base coat: After approx. 2 days (more if very deep recesses have been filled) depending on weather conditions affecting drying out time apply an 8-12 mm float coat. This should consist of 1-part Ionic Old White NHL3.5 mixed with 2 ½ parts well-graded washed river sand 3 mm down. Work should not start in frost conditions or with temperatures below 5 C. Scour back and key with a devil float after the initial setting. Check for shrinkage during the first 2 days and, if necessary, lightly dampen the relevant area, scour back, and re-key. Do not apply a finishing coat for 5-7 days, until the undercoat is adequately firm and any small amounts of shrinkage are complete and it has a dry surface. (Plastering on different materials: Where different materials meet, and where there are timber lintels and other changes in the background material it is necessary to insert a metal mesh at the joint (at least 100 mm. on each side). Consider the different suction characteristics of the background material.)
Finishing Coat: Finish with a fat lime mortar mixed at a ratio of 1:1, with fine silica sand. Apply no more than 3mm thick.
APPENDIX 4
GENERAL PAINT SPECIFICATION:
Background preparation: Repair any damage to the finish plaster before any painting begins. Sheet up and protect all glass and furnishings.
Primer: Apply one coat to saturation of Beeck Fixative diluted with two parts water. Leave for 24 hours.
https://www.womersleys.co.uk/shop/paints/external-paint/paints_for_external_renders/beeck-fixative-silicate-primer
First Coat: Apply one coat of White Beeck Maxil Pro. Leave for 48 hours.
https://www.womersleys.co.uk/shop/paints/internal-paint/paints_for_internal_plaster/beeck-maxil-pro-paint-maxol
Second and Third Coats: Apply two coats of Beeck Maxil Pro in the chosen colour. Apply by keeping a constant wet edge, keeping cutting in work as tight as possible and with a wet edge. Leave 24 hours between coats.
-------------------------------------------------------------------------------------------------------------------------------------------
[1] Peter Thornton, Authentic Decor the Domestic Interior 1620-1920 (London: Weidenfeld and Nicolson, 1985), 161–206.
[2] Thornton, 164–65.
[3] ‘AJ-EALING-GENERAL-A4.Pdf’, accessed 3 June 2020, http://www.lightperceptions.co.uk/wp-content/uploads/2014/04/AJ-EALING-GENERAL-A4.pdf.
[4] Heritage Trust for the Northwest, ‘Long Street Methodist Church Sunday School Decoration of Interior Rooms’ (Nelson, Lancashire: Heritage Trust for the North West, 30 July 2018), http://artsandcraftschurch.org/wp-content/uploads/2018/08/LSM-Decoration-of-Interior-Rooms.pdf.
Related Articles
On Sunday, March 16th, why not come for a full introduction to lime plastering and a practical demonstration workshop?
Learn more about traditional clay, lime, and ornamental gypsum plasters and their use internationally…
Proposals to carry out a conservation assessment at Wukro Cherkos, with a full training programme for recent graduates from Mekelle University and government bodies responsible for regional conservation work.
Introduction In response to continued concerns about the condition of one of Tigray’s most well…

Report on the support given by M Womersleys to Jabir Mohamed at Berbera Museum, Berbera, Somaliland, over two weeks from the end of October 2024
Contents …